Showing posts with label tips and tricks. Show all posts

Tuesday, June 27, 2017

Decorating a Boat (or Tiny Home): Putting the Fun in Function

I'm sure there are people out there who scoff at the idea of "decorating" a boat. Certainly the saltiest sailors of our time - Slocum, Mortissier, Johnston (all whom I love and admire) - cared very little about aesthetics when they were journeying... A boat, after all, is made to perform and safety and integrity should always remain top priorities. While I wish I had a little more of the rugged adventurist who could care less about fluffy things such as "decor" in me, I will say that I do not. I'm spontaneous and adventurous and up for a challenge, but I still love and crave certain creature comforts; namely I like the place I live to look nice and tidy and to feel inviting and homey.

When living on a boat or tiny home, however, the key is to enjoy these things while still being functional. Believe it or not, there are ways you can beautify your boat without spending hordes of money and sacrificing performance... Throw pillows, wall art, and rugs are the three easy ingredients and with a little planning, your boat can look nice and cohesive with minimal effort. I've written before about >>> making a boat a home <<< , but it's been a few years. Because >>> we have a new boat <<< now and my style has evolved, I have a few more tips and products to share for those fellow live-aboards and cruisers who, like me, prefer their boat to feel (and look!) like a 'home'.

Tips for decorating a boat:

1) Work with what you've got: This is stating the obvious, but there are certain things you cannot change on a boat. Where a mast is placed, how your saloon is laid out, and galley countertops are hard/impossible to change without doing major renovation. Work with what you have, at least to start. For example, our new boat has navy blue leather cushions throughout. We probably would not have chosen the 'nautical' navy blue ourselves, but re-covering all the cushions would have cost us a fortune. Instead, I worked them into our boat's color palette. Which brings me to my next tip...

2) Pick a color palette: This is the fun part! We love color! Check out these tips for picking a color scheme and then go generate one easily with this online tool. We chose a bright color palette that was largely dictated by colors in art we brought from our old boat and the navy blue of our cushions. Keeping the color scheme - whether it be muted and soft (beige, baby blue, gray), or colorful and bold (bright blue, green, turquoise) helps to keep the decor cohesive.

3) Incorporate pieces that coordinate but stand out: Large patterns on bedding and cushions are tough on a boat because they can make an already small space feel smaller, we really like sticking with our cushions/bedding being a solid, plain color and incorporating bold patterns in with our decor like pillows and rugs. Throw pillows and non-skid floor matts are a really easy way to bring color and patterns into a boat.

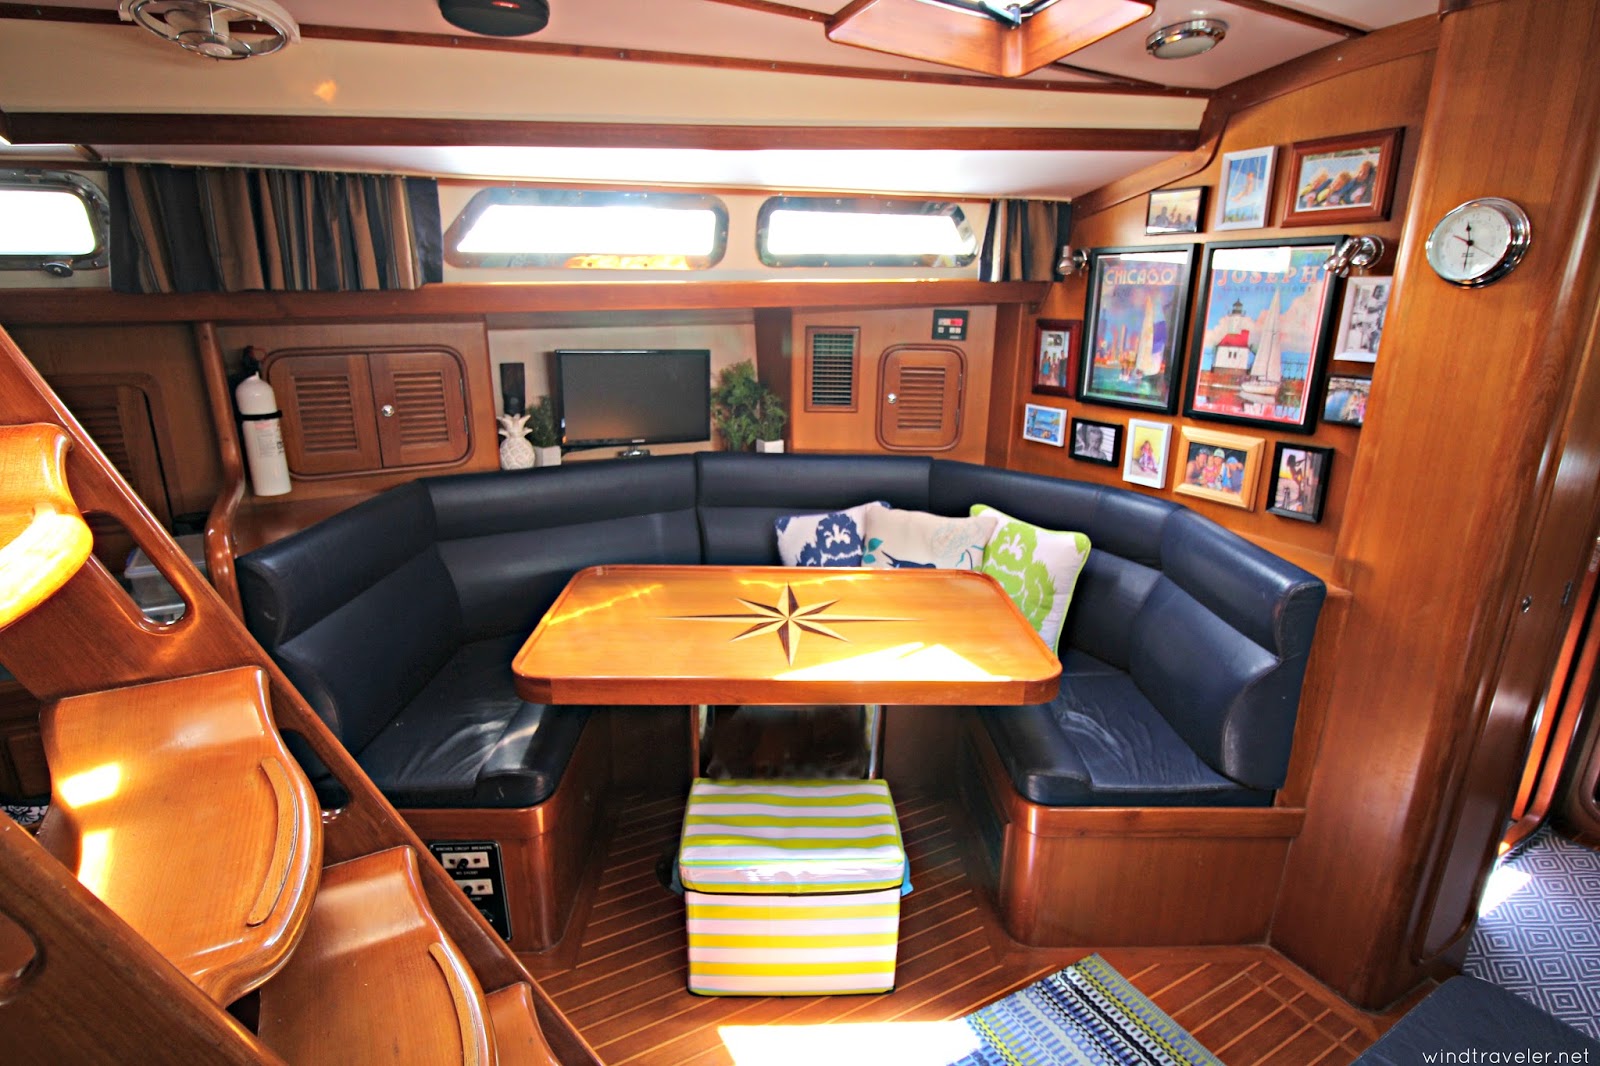
4) Utilize wall space: Because there is very little counter space on a boat, we have utilized wall space to decorate our boat with pictures, art, and decorative wall storage pouches to keep clutter at bay.

5) Look at the big picture: A boat is small and there isn't much separation from space to space so our whole boat is more or less decorated within our color palette. We use pillows, rugs, and photos to decorate our space which are easily swapped out and changed if we feel like redecorating. A lot of our pieces can also be switched from space to space if we feel like changing things up a little.

6) Don't forget functionality: Don't ever forget that a boat's purpose is to go sailing. This means that you must consider whether or not something really makes sense to bring aboard. For example, a vase in the center of the table is probably a bad idea, as it will most likely become a projectile when underway. We try to keep our boat as "sail ready" as possible so most of our decor is either secured to the boat or easily tucked away. We can be off the dock in no time, and that's how we like it.


Decorating a Boat: What's in our Arsenal

1) Art: Wall space is usually quite limited on a boat but where we do have it, we've added some art. For our wedding we were gifted a >>> Patrick Reid O'Brien <<< print and we loved it so much we brought it to our first boat, and it has been on every boat since. We have also added two more of his pieces. The art tells a story, the first depicts Chicago, where we met. The second, St. Joseph, Michigan, where we married. The third, Tortola, where we chose to settle. We don't have the "welcome friends' piece on this inspiration board, but it's similar to the pieces we do have (and I kind of want it!)

2) Scout Rump Roost Medium Bin: I am obsessed with all things Scout! We have four of >>> these bins <<< in our boat (both styles depicted on this inspiration board) and they are where our toys, spare linen, and the girls' dress up clothes live. They look super nice, fold flat, and - the best part - are water proof and sturdy enough to stand/sit on. Because space is at such a premium on a boat most - if not all - items should serve two purposes and these fit the bill perfectly.

3) Throw Pillows: I'm not sure if there is anything that causes more husband/wife discord than the number of pillows in a home, but in my experience, men see no point in these things. And, okay, they might be a tad superfluous but I love me some throw pillows and while Scott has put a strict moratorium on me buying any more, I think they really spruce up our boat and the girls love making forts with them all. Dual purpose! We got most of ours on from Amazon where they >>> have an awesome and very affordable selection <<<.

4) Gallery wall: This is my favorite feature of our new boat. I have always wanted a 'gallery wall' of family photos and we finally had the space for it on our Tayana. I mix and matched frames similar to >>> this set<<< ,and printed out some pictures. Everyone who comes aboard loves peeking at the pictures and I think it looks so nice and inviting as a main focal point in our boat.

5) Throw rugs: We have seven throw rugs on our boat. They make a huge difference in the look of our interior and I'm always on the hunt for >>> good ones<<<. Most of ours are indoor/outdoor rugs that are stain proof and easily cleaned, and we have non-skid mats underneath all so they don't slip. One thing that is tricky with rugs is that boat spaces are usually more narrow and don't fit regular sizes. What I do is measure the space where I want a rug to be, and then I go to Amazon and do a search for a rug of that dimension. It's worked well for me and you get more choices and styles. You could also have a rug cut down to size and bound by a professional.

6) Scout Hang Ten Bin: Another >>> Scout product we love <<<. We have about six of these in our boat and not only do they look nice, but they are sturdy and hold a lot. These bins are in our larger lockers to hold clothes and you will see one in the picture below in our bedroom holding my obscene multitude of trucker hats (the struggle is real).

7) Coordinating the galley: Because our saloon runs right into our galley, I've kept the decoration there in the same color palette. The pot holders, dish towels and most of our dinnerware coordinates with the other elements in our boat. These >>> magnetic nesting cooking utensils <<< were an awesome find because not only do they look nice, but the next together magnetically and take up zero drawer space.

7) Non skid mat: as I mentioned above, throw rugs are your friend. These >>> non-skid mats <<< are very durable, stain proof and have been on our boats from day one. The nice pattern is a big plus and they are small enough that they'd fit in just about any boat interior.

8) Turkish Towels: We love turkish towels on our boat and use them for the bath, beach and pool. We also use these >>> Turkish hand towels <<< for our dishes and they look nice to boot.

9) Wall organizers: I cannot stand clutter (hard to avoid with three kids but still...) and prefer a minimalist, airy and open feeling. We have four of these >>> wall organizers <<< in the girls' rooms and in both heads (bathrooms) affixed to the wall with industrial velcro and they look stylish and store things in an nice, organized way.

Tools we use:

1) Industrial Strength Velcro: We love this stuff on our boat and keep a >>> giant roll of it<<<. It is what we use to affix all our art and photos to the walls without having to drill holes into our boat.

2) Museum Putty: While we try to keep our counters clutter-free from projectiles that might go flying underway, we do have a few trinkets out here and there. >>> Museum Putty <<< makes sure they stay put.

3) Command strip anything: I love command strip hooks! We have three or four of >>> these hooks <<< behind every door and they hold towels, bags, hoodies and other stuff freeing up space in our cubbies and drawers and keeping clutter out of sight.

***

Those are our tips! What tips do you have for decorating a small space? Please share as we are always evolving over here and looking for new ideas. In the meantime, here is our space and what it looks like. I hope you enjoy!

Our bedroom. I love it so much. You can see our art (hung by velcro) as well as the "LOVE" adhesive above the bed

Here you see some more photos as well as bins I use to store my camera accessories as well as my trucker hats.

Our walk-thru galley. Everything still flows nicely to the back and front of the boat.

Another piece of art, velcroed to the wall. For the wire fruit basket we will have a hook drilled above it that a piece of bungee will attach to for rougher passages to ensure it doesn't fall over.

Another view of our saloon, the main living space in our boat.

Looking at our saloon towards the kid's berths.

The ottomon is more toy storage and I aboslutely love those super soft herringbone print pillows. There is a fiddle that goes across the book shelf so books do not fall out, but we remove it when we are docked so it's easier for the girls to get books out.

I could not resist the pinapple, it (along with the tiny fake plants) are super light and secured with museum putty. And who can resist putting out their shell horn for decor?
The gallery wall that I love so, so much. Pictures are also easy changed out. Again, secured with industrial velcro so no holes.

Looking forward to Isla's room. You see our newest piece of Patrick O'Brien art and some more rugs.
The twins's top bunk. They sleep up there together, by choice, despite having a bunk each. Their books are stored in bins.


Another view of their room. You can see a Scout bin on the bottom bunk for their stuffed animals.

Isla's room which is FULL of books! The super strong bungee running the length of the shelves prevents them from flying out when we heel over.

Wednesday, August 24, 2016

Selling Your Writing to Sailing Magazines: A Review

If there is one overwhelmingly popular way that would-be cruisers dream of filling the cruising kitty while underway, it is by writing. And why not? Ample time and a daily cocktail of equal parts adventure and inspiration provide plenty of fodder for stories. Not to mention the fact that the sea will often bring out the desire to wax poetic in a person. Sadly, writing doesn't always pay the bills...or, any bills for that matter. Not only is writing a famously meager way to make a living, but the cruising world is small and the publications that cater to us - and the audiences that read them - are limited.

BUT...all is not lost! There are many cruisers selling words and making decent money with their writing, and you can be one of them. The new book "Selling Your Writing to the Boating Magazines (and other niche mags)" is a step by step guide on how to, well... sell your writing to boating magazines. Turns out, there are tricks to successfully writing for niche publications and industry-proved ways to ensure your piece stands out in the crowd. While it is difficult to make a bonafide living by writing articles, published stories can be a fantastic way to drop coins (and sometimes many!) into the cruising kitty. You just need to know how.

"Selling Your Writing to the Boating Magazines (and other niche mags)" is your book. Author Micheal Robertson is not only a fellow live-aboard cruiser, but one of the people making a decent chunk of change with his writing, and has been for years. You might recognize his name among the authors of the fantastic book, >>>"Voyaging with Kids"<<< and he is regularly featured in the most popular sailing publications, so he knows what he is talking about when it comes to pitching magazines. His book is not only for sailors either, the tips and tricks can be applied to any niche publication. While his examples, contacts and anecdotes will be almost exclusively related to the sailing industry, they will be helpful to any writer try to break into the industry.

I obviously have a vested interest in this subject because, in time, I have big plans to ramp up my writing and (hopefully) make more money with it - so when he reached out to me for a review, I jumped at the chance...

The book is short, sweet and to the point. I read it in three days, so it is by no means overwhelming, which I loved. It assumes you know nothing about publishing, which makes it very easy for a layman to read. It's laid out in a very organized "step by step" way - from pitch to payment - any really demystifies the world of publication. "Selling Your Writing to the Boating Magazines (and other niche mags)" takes you through each and every step of the publishing process, he offers tips on how to make your piece stand out and how to forge good relationships with editors. In short, Michael lays out everything for you in a clean, easy to understand format. The only thing he doesn't do is write your piece for you.

Not convinced? Some other review snippets from very prominent cruisers and industry insiders:
“From now on when I get queries from sailors wanting to know how to get started as writers for the sailing press, I’ll recommend this book. It’s not just the book editors have been waiting for, it’s the book long awaited by every sailor who hopes to make a buck while pursuing his sailing dream.” —Karen Larson, Publisher of Good Old Boat
“Concise, useful and encouraging for any aspiring magazine writer, not just those in the sailing field.”—Lin Pardey, author of more than 400 magazine articles 
"Michael Robertson has done a great job composing a primer of practicalities for freelance writers. His clear advice is reinforced by having been widely published himself, allowing him to cite numerous useful examples from his own efforts."
—Tim Queeney, Editor of Ocean Navigator 
"If you’ve ever thought about sharing your passion by writing about what you love, you need this book. Michael Robertson has put together the ultimate toolkit for launching your freelancing dream." —Beth A. Leonard, freelancer, speaker, and author who supported herself for two decades writing from her boat
If you have dreams to sail off into the sunset and want to pen "freelance writer" in the occupation box on your customs forms, you need this book.

Who knows? You might even become the next >>>Fatty Goodlander<<<....

Happy writing!

Disclaimer: I received a copy of this book free of charge in return for my honest review. The thoughts and opinions expressed in this article are my own.

Saturday, August 20, 2016

Flying Solo with Three Kids Under Four or: That time I felt Like a #BossMom

It's difficult to know the potential for utter mayhem and chaos that three small people (two of them being twins) can bring unless you have/had three small children and/or twins. We can go from zero to pandemonium in .02 seconds flat, I have three relationship dynamics to manage at any given time, and did I mention my twins are two? So when it was decided for me through the workings of fate that I would be flying, solo, with my three tots age four and under to my mom's for our annual visit, I began having heart palpitations.

Many people offered words of wisdom and travel suggestions to me via >>Facebook<<, but almost all advice from other parents with a similar adult-to-child scenario replied with, "WHAT!?! ARE YOU INSANE?" because, like I said, these people get it. They know. They have tasted defeat by way of child terrorists and know how physically, spiritually and mentally crushing it can be.

But I thrive on a good challenge and despite the fact that there was chance I could have sent my eldest home with my mom so I would only fly with the twins, I decided that - nope - I was going full Monty. It was all or nothing. Once I'd gotten it in my head that I was doing it, my commitment to the challenge of a full day traveling with my three girls took on an almost Olympic quality. One puddle-jumper plus one layover plus one Boeing 737 and over ten hours of travel door to door would equal the ultimate mom test. I went into it with the attitude of "GAME ON".


***

We've flown a lot with our girls, and had both >>good<< and >>traumatic<< experiences, so I knew - in a way - what to expect on both ends of the spectrum. The only difference was this time, I would not have an extra set of hands to help me from losing a child and/or my sanity. No biggie, right? (insert emoticon with wide eyes). "Deep breaths, stay cool, and think like a ninja" - this was the mantra playing in my head as I mentally prepared for the day.  And prepare I did.

I spent almost a week of sleepless nights visualizing the task at hand, chatting with my trusted advisors (my fellow mamma tribe) and making lists. The night before the flight I was up from 1am till dawn running through scenarios (and worrying my ass off) to be sure I had everything in line. This might seem like overkill and possibly a little dramatic, but it's how I gear up (cue: Rocky Music). Preparation is key to successful travel with young children and I know too well that all it takes is one epic diaper blow out, one kicking and screaming tantrum, or one projectile vomit to really ruin a day. As much as I wish I was kind of person who flies by the seat of her pants by slapping on some lipstick, throwing a few things into a bag and strutting out in the world with her head held high, I am not. I err toward "Type A", make an insane amount of lists and am anything but haphazard when in travel mode with kids in tow. I've learned the hard way that being unprepared does you no favors when your kids are as young and as close in age as mine are.


***

Yes, I was prepared for it all. Blowouts (extra diapers, wipes), tantrums (lollipops, gummy bears), puke spillage (extra clothes for kids, layers for me), boo-boos (bandaids, antiseptic wipes) and sleeplessness (hello, dramamine!). My carryon was loaded with entertainment, food, drink and meds. I was a modern day Mary Poppins and my bag was packed to provide. While I had absolutely envisioned the day going smoothly in several versions of my mental trial runs ("hope for the best, expect the worst", right?), I wasn't prepared for the day to go...well, almost perfectly.

Okay, "perfectly" is a stretch. Our two hour layover turned into a five hour layover (thank God for the $32 sky lounge!! Best. Money. Ever. Spent.) and there was that moment going through security where I was on the verge of a very unfortunate/desperate potty mishap that came dangerously close to disaster (tmi??) and although I dosed my kids with dramamine, none of them slept a wink until the final two hours of our travel day meaning I was ping ponging between defense and offense all. day. long...but despite these minor glitches, the day went as good as I could have possibly wished for.

There were many moments when things could have taken a turn for the worse, but we managed to stave them off with lollipops (thank God for the lollipops!), new toys, and straight-up bribery.  I did whatever I could to keep my little sleep deprived babes at bay and all 'rules' went out the window. Sure, they ate pure junk all day (high fructose corn syrup and sodium, anyone?). Yes, I was utterly exhausted by the end of it (fourteen hours of travel door to door and running on almost zero sleep, yeah!) And, yep, we were a full blown spectacle to anyone who paid any attention to us, particularly in the (very long) security line ("Are you traveling alone with those three little girls?!")...but, we made it. We were grimy, sticky and punch-drunk at the finish line, but we made it. I even got few high fives and some kudos along the way.


We've been incredibly lucky with our travel karma (thank you Universe!) and our girls always seem to win over some strategic people during our journeys. During this day, our karma presented itself as an airport security woman who let the girls and I leave the security line (and come back to our same spot) so I could do the afore-mentioned desperate run to the bathroom. It manifested itself in an extra seat for Isla (who was across the aisle), and provided us with two Puerto Rican teens who entertained the twins for over an hour during our four and a half hour flight. The icing on the cake was a sweet flight attendant who was so impressed with the girls that she comped me not one, but two mini bottles white wine. Catching a slight buzz at 35,000 feet never felt so good.

***

By hour three of our final flight my girls were sound asleep around me, their angelic faces softened by the dim sepia-toned lights of the plane, their little bodies sprawled along the seats...We were on the home stretch and I thought to myself "we made it." Gazing at my girls nestled around me, my heart bursting with love for them I could not have been more proud of their behavior. And as this combination of love and pride swelled up in my solar plexus somewhere over Georgia, I started crying. The pressure in me released and I silently cried tears of joy and thanks. We had made it, and while a lot of luck was on our side, the girls and I were an awesome team and at that moment, I thought I could tackle just about anything. I took a sip of my wine, adjusted myself in my seat, and lifted my head to the screen to enjoy the end of the in-flight film.

***

Traveling with kids is hard. Parenting is hard. Like Olympians, sometimes our work pays off, sometimes it falls short, and sometimes we simply get unlucky. We don't always get the gold, but when we do - we owe it to ourselves to celebrate. On this day I got the gold. I was a boss mom. My babies were boss babies. And I was grateful.

Monday, May 23, 2016

10 Boat Features we Find Useful for the Baby on Board


Boating and babies go together better than you might imagine, however, there are a few concessions one must make in order for the transition to be a smooth one. The boat you choose is a big one. The vessel you select for your journey – it’s pedigree, age, performance and features – can and will hugely impact your experience and enjoyment. This rule applies whether or not you have kids on board. There are certain traits, however, that really seem to suit the “baby on board” moniker. After three kids and over four years of boating with babies and/or toddlers we have compiled a list of ten boat characteristics that make life afloat with little ones easier. If you are like me, anything that makes the already hard job of parenting less of a crazy train is worth noting, so take heed. These things might not be “essential” but will almost certainly impact the frustrating vs. fun factor. 

Plenty of cabins/bunks

We wish SO BADLY we had a third cabin, it’s insane. We will most certainly be upgrading to a new boat in the next couple years and you had better believe our next boat will have a third cabin. The twins currently share our v-berth, but Isla sleeps in a make shift bunk bed we made in our walk-thru. She loves it and it works great for her…now. It’s definitely got an expiration date as it’s smaller than a toddler bed and children have this uncanny ability to grow non-stop, not to mention the fact that her placement in the “main cabin” of our boat greatly inhibits our life after she goes to bed. We cannot cook, watch movies, or hang out in our salon once it’s ‘lights out’ for her. Not the biggest deal to befall a boater, but something to seriously consider when boat shopping.
sailing with babies

Plenty of water tankage

We used to be really conservative about our water use aboard when we cruised as a couple. We carried 60 gallons and had a 5 gallon per hour water maker that we’d run for a few hours once a week. We were so good and ecological! Now? We’re all “Who built the Ark? Let’s fill up that baby pool on the aft deck so the kids will play quietly for twenty minutes!” Luckily, when we were actively cruising with our eldest, we foresaw the need (or desire?) for more water and outfitted our boat with a high-output Cruise RO water maker. We sang it praise almost every day. Babies are messy. REALLY Being able to hose them off after the beach, the pool, or after they smear pasta sauce and/or god knows what else all over their adorable pudgy bodies really makes life easier. Not to mention the ability to do laundry regularly. We regularly rinse our boat, our clothes, ourselves and our kids and – believe me – life is better because of it!
sailing with babies

Ability to be singlehanded

This is a biggie for the baby boat because human babies are pretty damn dependent for the first couple years of life. We learned very quickly that once we had our first child, one person needed to be on boat duty, while the other was on baby duty. When sailing overnight, we both assumed watch schedules while Isla slept, but most of the time, mommy tended to all things baby, while daddy sailed the boat. Of course we both could do the other’s job (to a point, Scott couldn’t nurse the babies) but we found this arrangement worked well for us.

Center cockpit

There are those that love center cockpit boats, and those that don’t. We stand firmly and proudly in the first camp. A center cockpit is great for a ‘baby boat’ for so many reasons. For one, it provides a nice 360 degree buffer between the water and the child, which is always a nice bonus when it comes to a baby on a boat. It also allows for an aft cabin, which makes for a great en-suite master bedroom and a little separation from the front of the boat and kids. And finally the center cockpit layout provides an aft-deck which makes a great place to load and unload provisions, store beach gear an other miscellaneous effects, and makes for an ideal area to hose off and/or shower after a day at the beach.
sailing with babies

Swim platform

This makes getting in and out of the dinghy with babies tremendously easier. Having a nice, secure step or platform between the boat and the dinghy is great for doing the (sometimes precarious) baby-to-boat handoff. And if you ever find yourself solo parenting as I do? The step is almost a necessity! We will never own a boat without one of these!

One level interior

Having an interior with as few “levels” as possible is nice because, trust me, your baby will fall down those naughty little steps all. the. time. before they figure out how to climb up or down them. Granted, this window of time is super short so if you have a few steps (and I’m not talking about the companionway steps) fear not…but if you have the choice, a boat with a level interior will guarantee you hear fewer blood curdling screams from a tot that just took a tumble, not to mention give a little more surface to practice crawling or walking. Don’t get me wrong, your boat baby will take a ton of tumbles regardless – but if you want less, find a boat with less steps.
sailing with babies

Vinyl cushions

Never in a million years would I have outfitted a boat with white vinyl cushions, but holy heck am I glad webought a boat with them. I cannot even IMAGINE what our cushions would look like if they were regular interior fabric because the amount of food, sauce, paint, marker, crayon, pen, playdoh, juice and you don’t even want to know what else I have wiped off is INSANE. Three toddlers are messy. Period. Our cushions not only clean up like a breeze, but make me more laid back about messes (and making them! which, mind you, goes against my very tidy nature but is great for kids) because, “It’s cool, kids! Don’t sweat that spilled paint! Look, we just wipe it right up!” I mean, I wash our cushions using the same spray cleaner I use for the counters. It. is. awesome. Would not want a baby boat without them.
sailing with babies

Extra storage

We are definitely not minimalists, but we do try to limit what we bring on board. Even still, three kids equal a ton of crap. From booster chairs to books, from crafting supplies to clothes, from beach toys to building blocks – you will need a good place to keep it all. The more storage, the better. And if you can be well organized about it, even better. Organization on a boat is like golf, never mastered and a constant work in progress.

Two heads

This is one of the bonuses of a center cockpit boat. And whether or not you *think* you need an extra head they are sure nice to have because – ***spoiler alert*** – heads break down and people sometimes have to go “potty” at the same time. Toddlers, fyi, aren’t always great at holding it either and men, well…men tend to take their time. We love having two heads aboard and with a family of five, we’ve sung our extra head praise more than once, let me tell you!
sailing with babies

Aft deck shower

Salt water and sand do not belong in the boat. They are a major pain in the butt if they infiltrate the interior so your mission, should you chose to accept it – is to keep it out. The best way to do this, short of avoiding beaches and salt water all together (not advisable!) is to do a fresh water rinse immediately when you return to the boat. Note that this favorable feature combines line items #2 (water tankage) and #4 (center cockpit). Being able to rinse off completely before we ever set foot in our cockpit is wonderful and definitely keeps salt and sand at bay. We keep a little bin full of our wash soap and shampoo on the aft deck and usually rinse off at least once, sometimes two or three times a day depending on our excursions.
sailing with babies
So there you have the ten features we have found hugely beneficial to a boat with babies on board. It obviously goes without saying that these are things that we have found helpful and you might very have a different experience. We’ve seen families with children cruising on the most luxurious of catamarans with every gadget under the sun and we’ve seen families of five living aboard a simple thirty-two footer with as few systems as possible. It’s also worth noting that the baby and toddler stages of life are quick and fleeting, so whether or not your boat truly suits the baby stage might not be that important for you. Many of these features, however, will be enjoyed well past babyhood so keep that in mind. Either way, making sure you find a boat that works well for you and your family is the most important thing, so chose wisely. Fair winds!
THIS ARTICLE WAS ORIGINALLY WRITTEN FOR ZIZOO BOATS.

Friday, May 13, 2016

Teaching a Toddler How to Swim: What Is Working for Us

"Wow, you're kids must be great swimmers!" We hear this a lot from people when they meet us and learn that we live on a sailboat with our young children. While our girls are only aged two and four - very respectable ages to remain reliant on floatation devices, mind you - in the live-aboard/cruising world, many children are skilled swimmers by these ages. Ours, however, were not. I was embarrassed to admit that, "No, none of our girls swim actually..."feeling a little pang of parental shame and longing for the day my girls could swim freely like many of their boat and island dwelling peers. Regardless, I knew not to push or force the issue, to let things happen on their own time and remained patient and vigilant about exposing them to swimming children and plenty of time in the water.

A few weeks ago I made the acquaintance of the lovely "Grannie Annie" who is something of a legend here on Tortola (her husband started the infamous Willy T floating bar over at Norman Island). She moved here in 1957 and has been a swim instructor for over 40 years, instructing hundreds and hundreds of children how to swim during her illustrious career.  Her entire family - right down to the grandkids - are lovely and they give back to the community in big ways. She oozes patience and kindness and is the kind of soul you are happy to know. Immediately drawn to her, we started talking and she said she'd love to help teach our girls to swim once a week when time and weather permitted. I was thrilled.

So far, we have had ONE lesson with the lovely Annie and I am super proud to say, we now have a swimmer! And once things clicked, it happened fast (we laid some good ground work, for sure). There are steps we took that expedited things, and I am going to share what we did and what worked for us (because I now wished we'd done some of them earlier). Keep in mind, I am not a child swim instructor and have zero professional knowledge on this subject. It's personal, not professional, experience. I share what we have done and learned (some of which came from Grannie Annie, who *is* a professional), simply to tell you what worked for us, and what might work for you. I realize there are many different methods and schools of thought regarding teaching kids to swim, so these may or may not jive with you. If you happen to be a professional swim instructor and have other tips to add, I welcome them! Please add in the comments so we all can learn. As with anything regarding children, use your own discretion and do your own research if you have questions.
Isla's first lesson with Annie, she started with a small back float and lost it within the hour.
Teaching a Toddler to Swim, Tricks that Have Worked For Us:
  1.  Don't force it. Forcing kids to do things (like eat veggies, potty train, and wear the cute outfit grandma got them) usually doesn't bode well for anyone. As much as I'd loved to have had Isla swimming by age two, she simply was not interested. She loved the water, but hated (and I mean hated) getting her hair and face wet. We were patient and let her get comfortable very slowly. Bath time helped a lot with this, but she was still what I would call a "slow adopter". Every child is different. The twins, on the other hand, have no issue getting their heads and faces wet, blowing bubbles and going underwater, so they are much further ahead at age two than Isla was at their age. We concentrate as much as possible on having fun in the water and not making it torture. 
  2.  Expose them to water as much - and as early - as possible. This is also a no-brainer, but a child who is never around water is probably not going to be super comfortable in it. Practice makes perfect. We are very lucky to live in a marina with a gorgeous pool that we can use freely, and we bring our girls there at least four times a week to swim and play. Don't have a pool? No problem. You can get over a lot of swimming hurdles (like getting hair and face wet, learning to blow bubbles, floating on tummy, etc) in a backyard baby pool or even a bathtub. 
    Watering cans and water toys in a tub can go a long way in getting kids comfortable in the water
  3. Start them with simple tricks. As mentioned above, starting early with things like: getting your child comfortable getting his or her head and face wet (you can use a small cup, or one of those cups with holes in the bottom to create a shower effect), teaching them how to blow bubbles in the water, showing your child how to wipe water out of their eyes, and practicing the proper kicking position either using a pool noodle, floaties or a kickboard can go a long way in garnering the skills that lead to swimming. These little tricks will lay some solid groundwork to help set up your child for swimming success when they start lessons (either with you or an official program). Start simple and don't forget to make it FUN!
  4. Get them a mask, goggles and/or a snorkel. When Isla was still in her puddle jumper, the introduction of a mask and snorkel really kick-started her efforts to learn to swim. The mask got her so much more excited about swimming, not to mention it naturally put her in the correct position in the water (prone on tummy, not straight up and down like so many children instinctively do when first starting). The mask and snorkel also greatly improved her kicking motion from the ineffective "bicycle" kick to the proper swim kick. We use these Aqua Sphere goggles for our girls, which are great for swimming. And we have this mask and snorkel set for Isla, which she loves and actually prefers over goggles. 
    The snorkel was a HUGE hit with Isla and she snorkeled months before she swam
  5. Expose them to other kids swimming. There is no greater way to get a kid excited about doing something than to show him or her a friend or peer that is doing that same thing. When Isla would see her friends swimming in the pool without floatation aids, she would run up and ask when she could swim without them. Sometimes, a little peer pressure is a good thing. The fact that big sister is swimming now has Haven hot on her tail.
  6. Start with puddle jumpers. I know that using floatation devices is frowned upon by many swim instructors, but for me - bringing three toddlers to the pool by myself would be impossible without them. These Puddle Jumpers really gave my girls confidence in the water and gave me some serious peace of mind.  Our girls love swimming in them and the freedom and independence they allow. While they are rated for 30-50 lbs, we actually had the twins swimming in these much earlier, about sixteen months and just made sure to keep a close eye so no little arms slipped out. These are also Coast Guard Certified as child floatation devices so they can double as life vests on the dock or during dinghy ride if need be (we still use a proper life vest when sailing). Keep in mind, having these floaties on your children doesn't mean you can leave your kids unattended (one arm out of the sling and they will no longer float properly), but you can relax a little more knowing your kids will swim easily and comfortably wearing these.
  7. Move onto a progressive back float. We had some cruising friends visit us at the marina and their two (adorable) kids were the same ages as ours. Both their kids, however, could swim. "How?!" I asked, desperate. Hermione presented me with a progressive back float with four foam boards on it. The idea behind the float is three fold: 1) The kids must work to use them (do NOT take your eyes off the kids as this is a swim aid, NOT a floatation device) 2) They teach proper swimming positioning (on belly, not straight up and down) and 3) You can remove the foam boards one by one as your child gains confidence in the water. I ordered this brand and within two days Isla went from four floats to two. Haven, who started with four two weeks ago, is currently swimming two and well on her way to swimming unaided. Mira, our little 'lazy river' swimmer is happy as a clam to just float in the water in her puddle jumper still, and we're totally okay with that.
    Very proud of going from four floats to two. It was super easy and painless.
  8. Add fins. This right here is the piece de resistance and we have Grannie Annie to thank for it. Never in a million years would I have thought to put my toddler in fins to help her swim, but Annie told me that they instinctively teach kids to kick properly (and not simply bicycle) in the water. I was apprehensive, but trusted her implicitly. Within one hour of wearing the fins and getting used to them, Isla was confidently swimming without a float. It was amazing. She is still using the fins, mind you, which in and of themselves are a form of assistance I guess, but she is swimming properly, with good form and gaining more and more confidence every day. Soon enough we will lose the fins, just as we have every other device - but for now, these were the magic bullet that made the most dramatic improvement. Granny Annie got Isla's fins from K-Mart in St. Thomas, but if I were to buy a pair I'd go for these well-reputed toddler fins.
  9. Teach them to "zoom". Annie taught me this trick. What you do is hold your child under their arms alongside you near a wall or the stairs, somewhere they are comfortable and can easily stand or hold on, step a few feet away, and then "zoom" them - essentially glide by pushing through the water - back to where they can stand. This is how we got Isla swimming on her own. After three or four "zooms", she was good to go. The gliding feeling gave her the proper swimming sensation, and eventually she started kicking and swimming on her own. Note: this is a somewhat advanced technique and Isla protested a lot at first because it requires the parent or teach to let go of the child which can be scary for the child. But if we don't let go, how will they learn on their own? Eventually she got it. 
    The flippers that made the biggest difference of all!
Watching Isla learn to swim, and being a part of it every step of the way, has been one of the most incredible moments in parenthood for me thus far. "I am so proud of myself mommy!" she tells me. Obviously this particular skill is heavily weighted due to our lifestyle and the fact that being able to swim is not only a huge benefit to enjoying island/boat life, but also a means for survival, which is a huge relief. While we are certainly not at the point where I'd leave her in a pool unattended or take my eyes off her for any considerable length of time while she's in the water, she is getting stronger every day. We will continue her lessons with the infamous (and simply magical) "Granny Nanny Annie" and her skills will continue to improve. There is still much work to be done, but we turned a major corner over here and I hope our tips can help some of you to get your tots swimming!


A huge THANK YOU to the wonderful "Grannie Nanny Annie" who really helped us turn this corner. We are forever indebted to you! xo
Related Posts Plugin for WordPress, Blogger...